


FRENCHIC WAX & PAINT - HACK
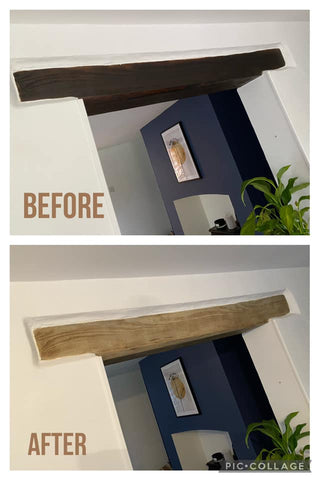
Light "oak surface" without sanding on dark log beams!
Yes! Frenchic Beam Hack, i.e. Wax & Paint technique, was originally developed to achieve the look of light oak on dark ceiling log beams using Frenchic products.
Here's how you do it:
You need brown Frenchic wax and natural white Frenchic paint. The surface is first painted with Lazy Range Crème de la Crème color and then Browning Wax is applied.
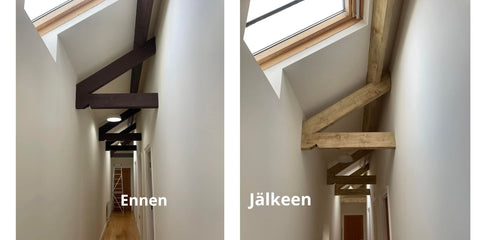
This simple technique allows you to completely change the look of dark, stained, or previously painted wooden beams without expensive, messy, and time-consuming sanding or sandblasting.
This wax & paint technique is most effective on textured surfaces (such as old log surfaces generally are), which Brown Wax highlights and defines as the wax collects in the grooves and hollows of the surface texture.
This technique creates a natural and light, like new wood surface effect.
On our videos on Instagram and on TikTok some ways to create texture are shown, go check them out to get the most out of this look!
Since ceiling beams are usually not exposed to wear, wax can be applied quite generously, which emphasizes the shaded wood effect.
What about surfaces other than log?
Over time, customers have started trying the same method on other areas around the home. This includes all kinds of interior wood parts -
Using wax & paint technique to create a natural oak look on such surfaces, which are often smooth, is however a different process than regular painting and requires a bit more time and effort.
Then finishing requires, for example, a brush or similar tool to pull the wood grain or desired striping on the wax surface if creating a Pottery Barn-style finish.
An alternative is also to create grooves from a smooth surface: You can create texture on a smooth surface yourself by using a hammer, saw, various blades, etc. Scratch and scrape the surface to get grooves and dents where the wax will adhere.
Additionally, over time regular maintenance will likely be needed, especially on areas and surfaces with heavy wear.
We recommend first trying on a small area - before a larger project, so you can see what kind of result you get with your chosen technique on your selected surface.
Wax on - Wax off
When using wax, it is best to apply it in several thin layers with a wax brush, allowing the wax to dry completely before applying the next layer.
Too thick wax layers never dry and remain sticky. So create the desired shade and surface with several thin layers instead of one thick layer.
Between each layer, wipe off (lightly polish) the excess wax: wax on - wax off.
Once you have achieved the desired shade, finally polish the surface vigorously with a lint-free cloth using a circular motion.
Note! The polishing phase is not necessary when waxing surfaces like ceiling beams, as they are not in any surface use. Thus, a thicker wax layer does not matter. Assess the use of the surface in your own project and perform the necessary steps depending on whether the surface will be touched or not.
Like paint, wax also has a certain curing time during which it hardens.
Buy your supply kit for your own wax & paint project here:
More instructions on the versatile use of Frenchic waxes can be found here.