

Posted by frenchicfinland Admin

FRENCHIC WAX & PAINT HACK
A light “oak finish” on dark log beams without sanding!
Yes! The Frenchic Beam Hack
The Wax & Paint technique was originally developed to create the look of light oak on dark ceiling log beams using Frenchic products.
Here’s how:
You’ll need brown Frenchic wax and off-white Frenchic paint. First, paint the surface with the off-white shade Crean Dream from the Al Fresco range, then apply Brown Wax.
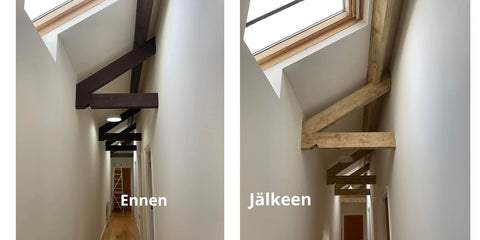
This simple technique lets you completely transform the look of dark, stained, or previously painted wooden beams without expensive, messy, time-consuming sanding or sandblasting.
This wax & paint technique works best on textured surfaces (such as old log surfaces, which usually are), which Brown Wax highlights and defines as it gathers in the grooves and crevices of the surface.
This technique creates a natural, light effect that makes the surface look like new wood.
Our videos on Instagram and TikTok show some ways to create texture. Take a look to get the most out of this look!
Since ceiling beams are not usually subject to wear, you can apply the wax quite generously, which enhances the rich wood effect.
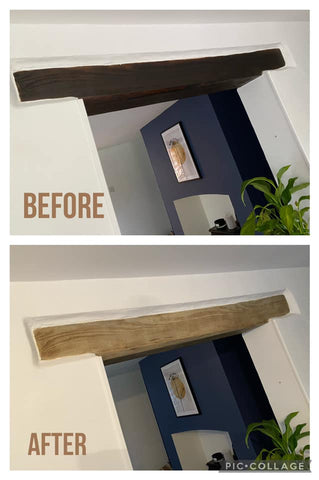
What about surfaces other than logs?
Over time, customers have started trying the same method in other areas around the home, too. This includes all kinds of interior woodwork -
Using wax & paint techniques to create a natural oak look on surfaces like these, which are often smooth, is a different process from ordinary painting and takes a little more time and effort.
For finishing, you will need a brush or similar tool to draw wood grain or the desired stripes into the waxed surface if you are creating a Pottery Barn-style finish.
Another option is to add texture to a smooth surface: You can create texture on a smooth surface yourself, adding scratches and dents with a hammer, saw, various blades, etc. Scratch and scrape the surface to create grooves and dents for the wax to cling to.
In addition, regular maintenance will likely be needed over time, especially on areas and surfaces subject to heavy wear.
We recommend testing on a small area first - before starting a larger project, so you can see what kind of result your chosen technique will produce on the surface you have selected.
Wax on - Wax off
When using wax, it is best to apply it in several thin coats with a wax brush, allowing the wax to dry completely before applying the next coat.
Wax coats that are too thick never dry and remain sticky. So create the desired shade and finish with several thin coats instead of one thick coat.
Between each coat, wipe off (lightly polish) the excess wax: wax on - wax off.
Once you have achieved the shade you want, finish by polishing the surface vigorously with a lint-free cloth using circular motions.
Note! Polishing is not necessary when waxing surfaces such as ceiling beams, since they are not used as surfaces. Therefore, a thicker layer of wax is fine. Assess how the surface in your project will be used and complete the necessary steps accordingly, depending on whether or not the surface will be touched.
Like paint, wax also has a certain curing time, during which it hardens.


